Here's a friendly guide on how to install your own paver project.
Materials Needed
Stone Base: Needs to be 3/4" crusher run or some type of aggregate base. This initial base gives the pavers its support for foot traffic or cars.
Bedding Sand: Concrete sand is ideal to lay and set the pavers in.
Pavers: These need to be calculated by the square foot and then add 5-10% for cuts, waste, etc.
Edge Restraint: This goes around the outside of the pavers where they are exposed or not up against a permanent structure.
Landscaping Fabric: Goes down before the stone base and helps maintain the integrity of the installation as well as acts as a barrier for weeds.
Tools
- Wooden stakes
- Wide blade mason's chisel
- 6-8 ft. 2 x 4 or 2 x 6
- Mason's string
- Stiff bristle street broom
- 3-5 pound rubber hammer
- Garden rake
- 4 ft. level
- 25 ft. tape measure
- Flat shovel
- Wheelbarrow
- Diamond blade wet saw
- Chalkline
- 3-5 HP vibrating plate compactor
- 1" diameter sand screed guides
Layout & Preparation
Measure the area you are going to pave and determine the square footage (length x width) while adding 5-10% to that for miscellaneous cuts and waste. Now measure the lineal feet of all edges not up against a permanent structure to determine how much edging your are going to need. Sketch out what your pavers are going to look like with all appropriate measurements. Mark out the outline of your project with stakes every 4-6' and at each corner. These stakes should be 8" outside of the planned edge of the finished pavement.
Excavation
Every excavation project needs to begin with calling Miss Utility company to get any underground lines located.
For patios and walkways, you need 6" of your aggregate base, whereas for residential driveways you need 10". To determine how far down to excavate, add your aggregate base plus 3 3/8" for the depth of the bedding sand and 2 3/8" for a standard paver (6" aggregate base + 3 3/8" bedding sand + 2 3/8" paver = 11 3/4"). Slope and grade are important to ensure proper runoff. It is best to plant at least a 1/4" per foot drop, but try not to exceed 1/2" per foot.
Base Preparation
This is the most important part of the paving process because any structure is only as good as its base.
First, run your plate compactor over the excavated area, making sure that soil does not get stuck to the bottom of the plate tamper. Compaction should be performed in one direction (North - South) then a second time at a right angle (East - West). Lay down landscaping fabric over the compacted subgrade.
Now spread your stone base material out evenly in a 2" layer. Starting around the outer perimeter, use the plate compactor to pack together the base, overlapping each pass about 4" and working toward center. You should be making two complete passes for each layer.
Sand Setting Bed
Lay the screed guides on top of the compacted base material 4' - 6' apart and parallel. Evenly distribute a quantity of bedding sand between the guides and drage the 6 - 8' 2 x 4 over the guides to create a smooth, even layer of sand, striking off any excess. When the pavers are set on the sand and compacted, the 1" of sand will compress to 1/2" to 5/8" thickness.
Laying the Pavers
Starting from a permanent edge, lay your first paver starting from either side. As you start laying pavers, work from right to left, then left to right, one row of pavers at a time. Set the pavers lightly onto the sand; never press or hammer them in. Every 4 feet run a string across the front of the laying edge to maintain straight lines.
Cutting the Pavers
Mark any stones to be cut and use either a diamond blade wet saw, a paver splitter or a hammer and chisel. Always wear safety glasses and use caution.
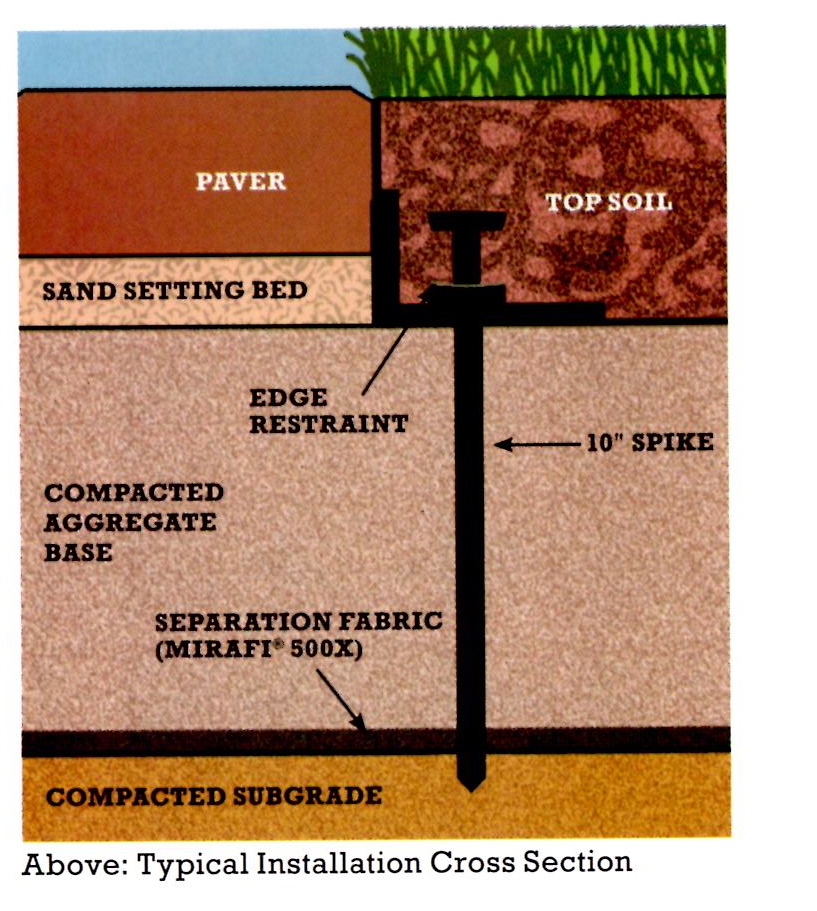
Installation of Edge Restraint
Restrain all edges that are not up against a permanent structure with an appropriate product. Any restraint material should rest entirely on the compacted aggregate base.
Seat the Installed Pavers in the Bedding Sand
Sweep the pavers clean prior to compacting. Cut a length of landscaping fabric to be used as a medium between the tamper and pavers. Start tamping around the perimeter and working inward, keeping the fabric between the tamper and pavers. Make at least two passes over the pavers, overlapping each pass 2-4 inches. Make the second pass at a 90° angle to the first. This final step will force the sand into the joints of the pavers creating an interlocking pavement. After compacting the pavers, sweep with sand again if needed.